Table of Contents
Introduction To Finger Wave Hairstyle
Finger Wave Hairstyle are maintained and a beautiful hairstyle that gives deep waves in the hair with the finger and some setting lotion or gel. In this guide, you will learn how to make stunning finger waves for women’s short and long hair plus tips, tricks, and frequently asked questions.
The History of Finger Wave Hairstyle
Originally, finger waves appeared at the beginning of the twenties and were already popular at the end of that decade as women cut their hair shorter, wearing short bobs, and needed elegant accents for that kind of haircut. The technique included the use of fingers to create S Shaped waves by applying the setting lotion and allowing it to dry on the hair.
While finger waves rose to prominence in the 1930s and 1940s, for Alist celebrities of Hollywood including Rita Hayworth, Betty Grable, and Lauren Bacall. This was a means through which women could get a well shaped eye popping figure that reflected elegance and glamor.
Even as finger waves ceased to be in style by the 50s and 60s they remain an important style icon of the 1920s and 30s. These days finger waves are popular again, and worn by ladies who appreciate retro styles for hair.
Finger Wave Hairstyles Instruction
Maybe it will sound surprising, but actually, doing finger wave hairstyles seems to be complicated, but the technique at all is quite simple. Follow these step by step instructions:
Section the Hair
Divide it into two halves with the help of comb beginning from the hair near your right ear and combing the hair at the center part or you may make it a left side parting depending on which you like most. Then, make a horizontal section across the back of the crown about the thickness of the crown in breadth. Tuck up the other hair because they will be interfering when you have to wash the hair on the head.
TIP: Use hair that can hold a curl because hair that’s wavy or curly naturally will work well in this process. Curly hair might be a little easier compared to straight hair.
Apply Setting Lotion
When applying the setting lotion, you should use the nozzle tip of the lotion bottle and make a straight line of the lotion on the side of that segment of hair. Making lotion gives the ability of holding and forming waves by setting the texture of the hair.
Shape the First Finger Wave
With your fingers, place your index and middle fingers side by side on the line of the setting lotion. Sweep the hair over your fingertips, coaxing this into an ‘ S’ like formation.
Pull your fingers then on the S Shaped wave and press them. Gently tame the partially smooth frizz and go on rolling into the desired position.
Create Parallel Waves
Repeat the process alongside the first wave, utilizing the finger placement as a means for distance and the shape of movements themselves. Move your hands in the opposite direction to the wave next to it.Make waves parallel and in a harmonized size type across the page. As required, you need to apply setting lotion between the waves.
A woman with parallel finger waves hairstyleSecond, here is an image of a woman with the parallel finger waves hairstyle she created.
Smooth Flyaways
Comb through with a fine tooth comb that has been washed in setting lotion and can also used in patting down stray strands of hair or fuzz between the sculpted waves. Recurl hairs as needed.
It is recommended that the section should be allowed to dry for sometime before unclasping the hair. Ideally finger waves should be sleek with a shiny appearance.
Full head repeat across
After the first section has been set, release the hair and comb another 1 2 inch of hair above the first at repetition the finger waving process.
This should be done to the hair line and each row slightly touching the other. Sweep such waves towards the face at the front to frame it. Thus, spray with finishing hairspray.
Check Out: Achieve Perfect 3 Finger Waves: A Step-by-Step Styling Guide.
Get Beautiful Retro Finger Wave Hairstyle
Follow these pro tips for salon worthy waves every time:
- Work cleanly: Comb each section before waving and wipe fingers with a towel frequently to avoid product accumulation on the fingers.
- Overlap slightly: Each waved section should slightly touch the other one to blend it together and not be separated.
- Direct waves intentionally: Curve waves towards the face framing layers Haircut. Switch the direction of the wave between two rows at an interval of one row.
Check as you go: Superimpose waves by putting it occasionally at the back to check whether the waves are proportional, and correct it as hair dries.
- Use quality products: Perhaps this is why it is important to use salon grade setting lotions and gels since drug store brands do not have enough hold.
- Set overnight: For longest holding waves, pin hair in bendy rollers after giving it the desired waves and go to sleep in the set.
Some Finger Wave Hairstyles

The best part of finger waves is that they can be created on bob hair, below collar bone hair or beyond the shoulder hair.
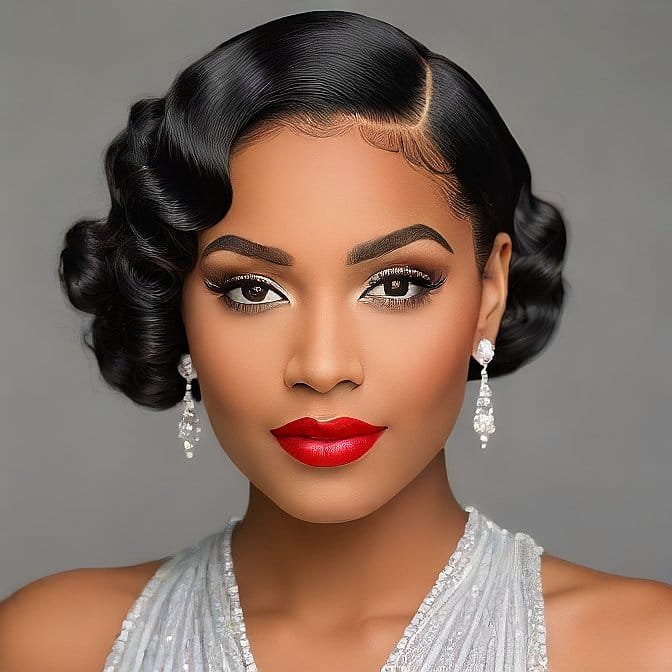
Short Bob Finger Waves
Woman with 1920s short finger wave
Such bobs In the 1920’s finished at the end of ears and included tight waved fingerlike waves.
This look calls for very short, close to touch waves which have to be well done. As for waves, they should be 1⁄2 inch sections and the next waves should overlap about 60%. Group waves one above the other rather than carving them horizontally.
Shoulder length Finger Waves
Woman with shoulder length finger wave hairstyle
For shoulder length hair with length in the middle, divide hair into larger 12 parts for volume and width of the waves.
Dissect curves to the collarbone neckline in order to spread the face. Ease down the volume by letting only a few pieces around the face frame straight rather than wavy.
Long Hair Finger Waves
As finger waves on long hair are concerned:
This style is something really glamorous. Long hair means larger sections can be waived, however, fullness is not a problem either.
Part hair deeply to one side. On the head tuck one side behind the ear whilst letting the other side free fall over the shoulder making the lady feel and look like a movie star. Continuation of waves involves maintaining large waves and soft looks which can be best created via operating just three or four fingers before stretching them apart.
How to Get Different Finger Wave Hairstyles?
While the standard finger wave features even, vertical waves uniformly sculpted across the head, stylists over the decades have created endless creative variations:
Sculpted Center Part
For the drama, increase waves size, they should begin to overlap and hair should be parted down the middle severely. 12 mm should be set for the front hairline and 23 mm for temporal area and 34 mm for the nape to achieve 610 defined Curves.
Fanned Waves
Do not sculpt the waves directly backward instead, arch sections somewhat when waving them. This results in seductively patterned zig zags pointing to one of the sides.
Figure 8 Waves
Pro stylists jut use oval pattern waves by interchanging the direction of the swirls made. Swim one set of waves an inch or two then swim perpendicular to the first direction making an eight figure pattern.
Sculpted Faux Bob
For the twenties recreated long bob look which does not involve haircut, waves ought to be swept under at the chin length. Pull the rest of the hair to the other direction closely in curls or lengthen in the back portion.
Conclusion
It is thus important that finger waves should be properly maintained to last for the entire evening as per the information below. Follow these upkeep tips:
- Get the right products such as humidity fighting hairspray and strong working hairspray
- Refresh waves: replenish waves through finger curling pieces as necessary and by re application of the spray.
- Ogol: Do not expose to moisture including steam, sprinkler systems and rain for extended period of time
- Remove oiliness from hair line and other shiny areas
- Do not wear hats or helmets with head Ops that you put pressure on the sculpted figure
- Sleep carefully: tie waves in a loose top knot or carefully on satin rollers
For More Info: Click Here.
FAQs
Is shorter hair required for finger waves?
No – finger waves look perfect for short bob hairstyles, medium and even the long hairstyle would look majestic. Thicker and longer hair can make loose waves bigger. Change the sections’ size according to hair length and style:
Can one sleep with finger waves?
Secure into a loose top knot, or roll carefully into foam rollers if waves should be tight, unravel and go to bed with perfect waves overnight. Satin pillowcase should always be used while sleeping.
Can finger waves be done on Thick and curly hair?
Yes, they yield pretty nice textures on all types of hair. Those with thick or curly hair may well want to use a pomade or gel with an extremely high control. Finger waves average well on hair that is capable of setting curls.